Showing posts with label Tutorial. Show all posts

Thursday, 7 December 2023

Multi-Factor Authentication (MFA) over ssh

Free OTP MFA
Securing your internet-facing systems and data is of utmost importance. One critical aspect is ensuring secure access to your servers and protecting them from unauthorised access. Multi-Factor Authentication (MFA) adds an additional layer of security by requiring users to provide two or more pieces of evidence to authenticate themselves. In this tutorial, we will explore how to set up MFA for SSH using FreeOTP, an open-source OTP (One-Time Password) authenticator app.

Prerequisites

Before we begin, make sure you have the following:

  1. A Linux server (Ubuntu, CentOS, or any other distribution)
  2. Administrative access to the server
  3. A smartphone (iOS or Android) to install the FreeOTP app

Step 1: Installing FreeOTP

  1. On your smartphone, open the respective app store (Google Play Store or Apple App Store).
  2. Search for "FreeOTP" and install the app.
  3. Once installed, open the FreeOTP app.

Step 2: Configuring SSH for MFA

  1. Connect to your server using SSH with administrative privileges.
  2. Open the SSH configuration file using a text editor (e.g., nano or vi).
    •  sudo vi /etc/ssh/sshd_config

  3. Look for the ChallengeResponseAuthentication line and set it to "yes" if not already enabled.
  4. Add the following line to enable the use of Google Authenticator-compatible TOTP (Time-based One-Time Password) authentication:
    AuthenticationMethods publickey,password publickey,keyboard-interactive
  5.  Save and exit the SSH configuration file.

Step 3: Configuring the User for MFA

  1. In the SSH configuration file, find the Match User or AllowUsers section for the user you want to enable MFA for.
  2. Add the following line below the user entry:
    AuthenticationMethods publickey,password publickey,keyboard-interactive
  3. Save and exit the SSH configuration file.

Step 4: Restarting the SSH Service

  1. Restart the SSH service to apply the changes.
    • sudo systemctl restart sshd

Step 5: Enabling MFA for the User

  1. On your server, generate a secret key for the user using the following command:
    google-authenticator
  2. You will be presented with a series of prompts. Answer "y" for each of them to configure MFA.
  3. Scan the displayed QR code using the FreeOTP app on your smartphone.
  4. FreeOTP will add your server as a new account and start generating one-time passwords.
  5. Complete the setup process by following the on-screen instructions.

Step 6: Testing the MFA Setup

  1. Attempt to SSH into your server using the user account that has MFA enabled.
  2. After entering the username and password, you will be prompted for the verification code.
  3. Open the FreeOTP app on your smartphone and find the account associated with your server.
  4. Enter the current one-time password generated by FreeOTP.
  5. If the authentication is successful, you will gain access to your server.

By implementing MFA for SSH using FreeOTP, you have taken a significant step towards bolstering the security of your server. MFA provides an additional layer of protection against unauthorised access and greatly reduces the risk of compromised user credentials. Remember to enforce strong passwords and regularly update your system to maintain a robust security.

In future tutorials (when I get the time) I will show how to further harden your system with fail2ban and geoblocking.

Sunday, 18 April 2021

Installing Apache on Windows Server 2016

Occasionally, someone will want something that runs best on Linux to be installed on a Windows server. There are various reasons for this, but usually it comes down to "I'm not comfortable with Linux, I want this to run on Windows". Regardless of the reason, if that's what the customer wants, that's what the customer gets.

Just to be clear this point, I'm referring to a WAMP server (Windows Apache MySQL PHP) as close as possible to a 'standard' LAMP server (Linux Apache MySQL PHP) that you'll get from the repo of your favourite distro.

That being said, the LAMP server you'll get from RHEL/CentOS will be significantly different from the one you get from Ubuntu.

When it comes to running Apache on Windows, for strange reasons, that simple decision makes the world a whole lot more complex. You see in Linux, when you decide to run Apache, pretty much all the decisions of 'how' have been made for you by the distribution you are using. And unless you decide to roll-your-own - which most people don't do AND increasingly this is a bad thing to do - they are the decisions you now deal with.

Under Windows, that's not the case. There are more ways to run Apache under Windows than you can poke a stick it at. (If you want to get pedantic, you can say there are an infinite number of ways, but don't go there). A lot of these methods are excluded by the "why" you are running Apache, we'll look at a few of these.

The default way is to download Apache from Apache.org and go from there. That's a lot of work and leads to a lot of stuff being left out.

However, if you want to run Apache as bog standard as possible, without having to do too much low level work, Apache Lounge is a good way to go and the one I'll be detailing here.

Procedure

Firstly download the binaries from here. Choose the appropriate version (generally 64 bit) and unzip the archive. While you're waiting for it to download, get the Windows c++ runtime redistributable that is appropriate. Apache lounge is written in c++ and requires this in order to run. The Apache Lounge readme and download page will show you which version is necessary - which is currently 2017. Later versions will (may) work, but it's best to get the version the application was written for. Earlier versions will not work.

Apache Lounge is easier to work with than the official Apache distribution. It also 'feels' more flexible. Try both and you'll see what I mean. What I really like is being uncoupled from the "program files" paradigm of Windows. I personally prefer to have both the binaries and the data separate from the C: drive, so that's the assumption we'll be using here.

Next extract the zip files and copy the Apache24 directory structure to D:\apache24. It may be a good idea to change the folder preferences for full visibility including hidden files and showing the filename extension.

As an aside here, it is also a good idea to prep your server to have the following utilities installed and available:

 - Chrome browser (or firefox, safari, opera etc)
 - putty
 - winscp
 - telnet client
 - tftp client

Edit the D:\apache24\conf\httpd.conf file to add/edit lines as follows (in most cases this is done by looking for the near identical line and either editing it or remove the '#':

Define SRVROOT "D:/Apache24"
Listen *:80

LoadModule rewrite_module modules/mod_rewrite.so
ServerAdmin <youremailaddress> 
ServerName <your servername or localhost>:80
DocumentRoot "D:/webroot" 
AllowOverride All  
<Directory "D:/webroot"> 
Check the config file carefully. Work here will pay off later.
Change to the bin directory and run the following:

httpd -t

If the configuration is fine, check that ports 80 and 443 are not in use by running:

netstat -ao | findstr ":80"
netstat -ao | findstr ":443"


Most likely you'll find port 80 in use. The last number is the process ID of the service tying up the port. Identify the service from the process ID using Task Manager and disable that service. If the PID is 4, then this is the system service http.sys and it becomes annoying and potentially a problem....

Under later versions of Windows Server, some processes communicate using http via port 80. The purpose of http.sys is to redirect that data to the appropriate service. You can test this by using the telnet client to telnet to 127.0.0.1 80 and pressing return twice. You should get something like the following as output:


What this means is that one or more native windows services are dependent upon the http.sys service to operate. You have to decide if you can live without these services. If not, then you need to select a different port for Apache to use for http traffic or use it for https only. If this is the case, edit the config file and change the listening port from 80 to something else (for now). We can remove http and make the server https only later on.

If you can live without the services, firstly stop the http.sys service using

net stop http

You will get something like the following:

Answer 'y' and stop the services. You can (and should) script this process by taking not of all the services that need to be stopped and explicitly stopping them. You will likely have to do this frequently.

MySQL/MariaDB

Download MySQL installer and MySQL workbench
(From https://seravo.fi/2015/10-reasons-to-migrate-to-mariadb-if-still-using-mysql) 

The original MySQL was created by a Finnish/Swedish company, MySQL AB, founded by David Axmark, Allan Larsson and Michael ”Monty” Widenius. The first version of MySQL appeared in 1995. It was initially created for personal usage but in a few years evolved into a enterprise grade database and it became the worlds most popular open source relational database software – and it still is. In January 2008, Sun Microsystems bought MySQL for $1 billion. Soon after, Oracle acquired all of Sun Microsystems after getting approval from the European Commission in late 2009, which initially stopped the transaction due to concerns that such a merger would harm the database markets as MySQL was the main competitor of Oracle’s database product.
MariaDB (new logo) 

Out of distrust in Oracle stewardship of MySQL, the original developers of MySQL forked it and created MariaDB in 2009. As time passed, MariaDB replaced MySQL in many places

 https://downloads.mariadb.org/
Current is 10.3.15 stable. Download x64 msi package.

Installation of MySQL

Download MySQL Workbench. Trust me: You need this!

 https://dev.mysql.com/downloads/workbench/
 

Current version 8.0.16 Requires

Microsoft .NET Framework 4.5

Visual C++ Redistributable for Visual Studio 2015

MySQL Community Server

https://dev.mysql.com/downloads/windows/

The full installer includes all windows packages and is a 373MB download. The installer is 32 bit but it includes both 32 and 64 bit binaries.

The installer does not permit upgrades between major and minor version numbers - these are installed as separate server instances - but it will perform upgrades within a release series eg: 5.7.18 to 5.7.19.

The installer also requires .NET Framework 4.5.2 or later.

Post installation testing of MySQL/MariaDB

The service should start immediately after installation. Check the MySQL service is running.

Check you can login from the command line using the root user and password generated before. 


Installing PHP

(From https://www.php.net/manual/en/install.windows.php)
 
PHP 5.5+ require at least Windows 2008/Vista, or 2008r2, 2012, 2012r2, 2016 or 7, 8, 8.1, 10. Either 32-Bit or 64-bit (aka X86 or X64. PHP does not run on Windows RT/WOA/ARM). As of PHP 7.2.0 Windows 2008 and Vista are no longer supported.
 
PHP requires the Visual C runtime(CRT). Many applications require that so it may already be installed. 
 
PHP 5.5 and 5.6 require VC CRT 11 (Visual Studio 2012). See: » https://www.microsoft.com/en-us/download/details.aspx?id=30679
 
PHP 7.0 and 7.1 require VC CRT 14 (Visual Studio 2015). PHP 7.2 and 7.3 require VC CRT 15 (Visual Studio 2017). PHP 7.4+ requires VC CRT 16 (Visual Studio 2019). 
 
The Microsoft Visual C++ Redistributable for Visual Studio 2019 is suitable for all these PHP versions, see » https://visualstudio.microsoft.com/downloads/

So we will be installing 7.3 from https://windows.php.net/download

Which version do I choose?

IIS

If you are using PHP as FastCGI with IIS you should use the Non-Thread Safe (NTS) versions of PHP.

Apache

Please use the Apache builds provided by Apache Lounge. They provide VC14 and VC15 builds of Apache for x86 and x64. We use their binaries to build the Apache SAPIs.
With Apache you have to use the Thread Safe (TS) versions of PHP.

VC14 & VC15

More recent versions of PHP are built with VC14 or VC15 (Visual Studio 2015 or 2017 compiler respectively) and include improvements in performance and stability.
- The VC14 builds require to have the Visual C++ Redistributable for Visual Studio 2015 x86 or x64 installed
- The VC15 builds require to have the Visual C++ Redistributable for Visual Studio 2017 x64 or x86 installed

TS and NTS

TS refers to multithread capable builds. NTS refers to single thread only builds. Use case for TS binaries involves interaction with a multithreaded SAPI and PHP loaded as a module into a web server. For NTS binaries the widespread use case is interaction with a web server through the FastCGI protocol, utilizing no multithreading (but also for example CLI).

What is PGO?

Profile Guided Optimization is an optimization feature available in Microsoft's Visual C++ compiler that allows you to optimize an output file based on profiling data collected during test runs of the application or module.

Links:

amd64 (x86_64) Builds

PHP 7 provides full 64-bit support. The x64 builds of PHP 7 support native 64-bit integers, LFS, 64-bit memory_limit and much more.


  copy to D:\php7
  copy php.ini
  edit php.ini

Add C:\php to the path environment variable

To ensure Windows can find PHP, you need to change the path environment variable. Open Settings, type ‘environment variables’ into the search field and open the result. Select the “Advanced” tab, and click the “Environment Variables” button.
Scroll down the System variables list and click on “Path” followed by the “Edit” button. Click “Edit text” and add ;C:\php to the end of the Variable value line (remember the semicolon).

 edit httpd.conf to add index.php to the DirectoryIndex variable

At the bottom of the file, add the following lines (change the PHP file locations if necessary):
# PHP5 module
LoadModule php5_module "c:/php/php5apache2_2.dll"
AddType application/x-httpd-php .php
PHPIniDir "C:/php" 

Save the configuration file and test it from the command line (Start > Run > cmd):

cd Apache2bin
httpd -t

PECL extensions are pre-built for Windows and available from: » http://windows.php.net/downloads/pecl/releases/
 
Some extensions use features specific to some Unix systems and so are not available on Windows. Otherwise, all extensions are available for Windows. 

PEAR
Open a command prompt with administrator privileges. Use curl to download the pear install file into the php7 directory

curl -OL http://pear.php.net/go-pear.phar

If you use a browser to download the file, it renders as text but with binary characters embedded. This will stop the script from working, hence the need to use curl.

set PHP_PEAR_SYSCONF_DIR=D:\php7

php -d phar.require_hash=0 go-pear.phar

You will then be prompted with a few questions. If the defaults don't work, you probably haven't elevated the privileges of the command prompt. If option 12 lists the Windows path, you haven't set the PHP_PEAR_SYSCONF_DIR variable. Editing here doesn't work, which is why you need to set the variable. You will need to enter the path to cli.exe- in our case this is d:\php7.


Note: If any of the directories already exists, you may get a 'permission denied' error for that directory. In which case, delete the directory and run the script again.

The rest of the defaults should be okay, but check them anyway. Once finished, a reg file called PEAR_ENV.reg will be created. Execute that to add the necessary keys to the registry.

Finally, check that PEAR is working using pear version:

Conclusion

Now, hopefully you read all this through before attempting it and are utterly confused by the process. If you, that's great! No go and install Linux and deploy Apache that way. Trust me! It's much easier and safer. Plus when you get into trouble and need to troubleshooting, pretty much any article you'll find will assume you are using Linux.

Tuesday, 11 December 2018

Tutorial: CentOS 7 Installation guide for vmware ESX environments (Part 1)

Although this guide is written specifically for ESX environments, it translates easily to other virtual environments. The same general rules apply even if he steps are slightly different. There is an exception for MS HyperV where its easier just to leave the FDD emulation rather than removing it.

If you're installing RHEL, Fedora, OL or Scientific Linux rather than CentOS, most of the installation will apply although OL has very different recommendations. The instructions here detail a minimal install (Micro-Instance) which will give you an very basic server. Instructions for different footprints will follow in subsequent blog entries. These instructions are based on the 7.4 release of CentOS.

Best practice is to install CentOS from either the NetInstall ISO or the Minimal ISO. Currently, the NetInstall (rev 1708) is 422MB. The Minimal is 792MB. The minimal install contains everything needed to setup a basic server. Additional services must be installed from repositories. The NetInstall requires an active Internet connection (and hence a working NIC) in order to complete even a basic installation. By contrast, the standard ISO is 4.2GiB in size.

It must be assumed that everything is out-of-date as of the initial release. So installing from the standard ISO achieves little as most packages will need to be updated from the repositories. The procedure shown will be using the NetInstall ISO.

FirstCopy the ISO to the vmware ESX server’s ISO folder in the datastore or some location that is easy for you to install from.

Minimal Server Installation (Micro-Instance)


1) Create new server in ESX using ‘typical’ configuration and give it a name.
2) Select the Datastore for the vmdk files and press next.
3) Select Operating System (Linux, CentOS 64bit)

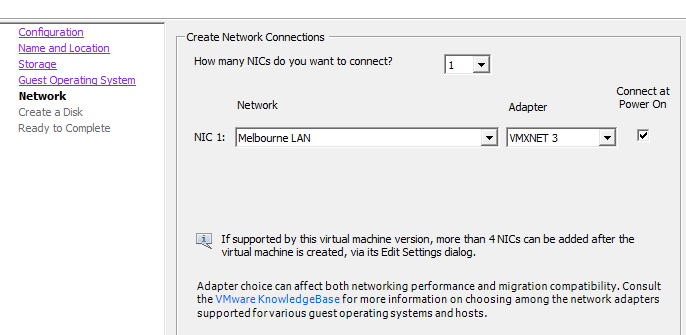
4) Select appropriate NICs. You will need at least one that has access to the Internet. You can add others now (preferably) or later. Make sure you use the VMXNET3 adapter with connect at power on. Use of the e1000 adapter has been shown to cause problems, particularly during ESX upgrades.

5) Setup virtual disks on the datastore. For a micro-instance, we will need to have it thick provisioned. For larger servers, we can create virtual disks for other partitions – these can be thin provisioned, but any partition containing a boot or swap partition needs to be thick. For larger servers, you will likely have the data-containing partitions on a separate SAN connected via multipath.

The disk allocation for a micro-instance should be between 12GB and 32GB. Larger than that and you should allocate a second(or more) disks. If the specific calls for a specific disk size, definitely create another disk – either thick or thin provisioned. For large footprints, eager zero is preferred, but lazy zeroed is fine for a micro-instance.


6) Edit the VM settings (tick box) and click continue. Modify the settings as follows:
  1. Memory: 2048MB is the default. For a micro-instance, this can be reduced to as low as 1024MB – particularly if you don’t plan on a GUI (which you shouldn’t anyway).
  2. CPUs: 2 virtual sockets with 1 core per socket for micro-instance or medium. Increase only as required by application. By choosing 2 cores, SMP will be installed in the kernel. You can reduce it to one later, but make sure there are at least two at installation time.
  3. Video Card: Leave at 4MB with 1 display unless you need a GUI. Then increase to 12MB.
  4. CD/DVD: Set to the CentOS NetInstall or MinimalInstall ISO you added earlier. Check ‘Connect at power on’.
  5. Floppy: Remove


7) Click ‘Finish’

8) Select newly created server in the client, connect to the console and power on.


There should be no need to test the media, so just select ‘Install Centos’. The CentOS installer will then boot:

CentOS Installation (GUI)


1) Language: Select English and your location in the world. In my case, this is Australia.

2) Installation Summary: You will need to modify ‘Date/Time’, ‘Security Policy’, ‘Installation Source’, ‘Installation Destination’ and ‘Network and Host Name’. Since this is a Net Install, we need to modify the Network and Hostname first.


3) Network and Hostname. Enable the network adapter. This will perform an automatic DHCP. Unless you plan on using DHCP for your servers, you should change this to a static address. Change the hostname to the FQDN of the server.


Use the configure button to change the name of the adapter to something easier to remember. You can also change the MAC address here. This is useful if you are creating an immutable server. Under the ‘General’ tab, select “Automatically connect to this network when it is available”. Set the IPv4 address and DNS settings. Add IPv6 if utilised. Click ‘Save’ and then ‘Done’ when finished.


3) Date/Time: Change the timezone if required. Check that NTP is enabled and working.


4) Installation Source: Enter the Centos mirror address and uncheck the mirror list checkbox. Click done and CentOS will begin updating its repository list.

5) Software Selection: I know this is tempting to select what you want here, but stick with the minimal install for now. The only time you really should select anything is if you are installing a compute node or virtualization host.

6) Installation Destination: For a micro-instance, you can settle for the defaults. This will create two physical partitions. The first (sda1) will be a 1GiB boot partition formatted for xfs (the default now under CentOS7). You can change this to ext4 if you like. The second physical partition will use LVM (Logical Volume Management) with two LVM partitions made up of a 1.5GiB swap partition and the rest allocated to root. For simple servers, this will be adequate. Otherwise, modify it here according to the size/space/capability recommendations. Everything here is completely customisable.


7) Once you click ‘done’. You will be given a list of changes the installer is about to do based upon your selections. Check them carefully before accepting.


8) Lastly, we will need to select a security policy. This is an area often overlooked and most installations will choose the default XCCDF profile which contains no rules, although rule lists can be downloaded and applied here. Unless mandated otherwise, use the Standard System Security Profile. The security profiles are administered by Red Hat and not even vetted by CentOS. You will need to consult RHEL documentation for details. In brief, it contains thirteen rules to ensure a basic level of security compliance.

There is a HUGE caveat with the use of security policies: They are something of a black art and emphasise security above all else. This can result in unpredictable changes to your system without notification.

If you want to harden the CentOS setup, I’ll deal with that later. For now, just select the Standard Profile.

Note: There is a bug with the 7.3.1611 ISO with all four STIG security policies that has been fixed with 7.4.1708. Security profiles "Standard System Security Profile" and "C2S for CentOS Linux 7" can't be used in the CentOS 7.5.1804 installer. A bug causes the installer to require a separate partition for /dev/shm, which is not possible.

We could spend hours here. We won’t. That will come with server hardening - when we get to it.


9) Next, click ‘Begin installation’ and installation will start. The next page will work concurrently with the installation.


10) Create a root user and a normal (administrative) user. Ideally, you will only ever use the root login once. After that we will disable root logins completely except from the console. To gain root privileges, you will need to elevate them using sudo by placing administrative users in the ‘wheel’ group (more on that later).

Set the root password to something long a difficult but easy to remember. Make it at least 15 characters by using a phrase with upper/lowercase and numbers eg: 1veGot4LovelyBunch0fCoconuts. Store this password in a secure place (eg keysoft secured by two factor authentication). You will only need this password once and in case of emergencies.

The second user should be your account or a GP admin user. Make sure the password used is strong.


Once installed, select ‘Reboot’. You should disconnect the ISO at some point. Once the server has booted, you will be greeted with the CLI login screen:


At this point, the installation is complete! Login with your admin user and proceed to configuration.

Tomorrows blog entry will deal with configuration.