If you're installing RHEL, Fedora, OL or Scientific Linux rather than CentOS, most of the installation will apply although OL has very different recommendations. The instructions here detail a minimal install (Micro-Instance) which will give you an very basic server. Instructions for different footprints will follow in subsequent blog entries. These instructions are based on the 7.4 release of CentOS.
Best practice is to install CentOS from either the NetInstall ISO or the Minimal ISO. Currently, the NetInstall (rev 1708) is 422MB. The Minimal is 792MB. The minimal install contains everything needed to setup a basic server. Additional services must be installed from repositories. The NetInstall requires an active Internet connection (and hence a working NIC) in order to complete even a basic installation. By contrast, the standard ISO is 4.2GiB in size.
It must be assumed that everything is out-of-date as of the initial release. So installing from the standard ISO achieves little as most packages will need to be updated from the repositories. The procedure shown will be using the NetInstall ISO.
FirstCopy the ISO to the vmware ESX server’s ISO folder in the datastore or some location that is easy for you to install from.
Minimal Server Installation (Micro-Instance)
1) Create new server in ESX using ‘typical’ configuration and give it a name.

2) Select the Datastore for the vmdk files and press next.
3) Select Operating System (Linux, CentOS 64bit)

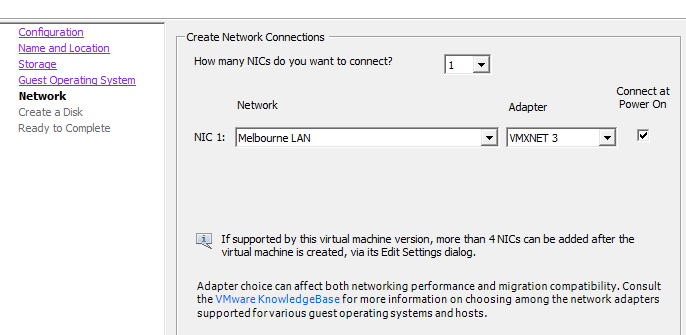
4) Select appropriate NICs. You will need at least one that has access to the Internet. You can add others now (preferably) or later. Make sure you use the VMXNET3 adapter with connect at power on. Use of the e1000 adapter has been shown to cause problems, particularly during ESX upgrades.
5) Setup virtual disks on the datastore. For a micro-instance, we will need to have it thick provisioned. For larger servers, we can create virtual disks for other partitions – these can be thin provisioned, but any partition containing a boot or swap partition needs to be thick. For larger servers, you will likely have the data-containing partitions on a separate SAN connected via multipath.
The disk allocation for a micro-instance should be between 12GB and 32GB. Larger than that and you should allocate a second(or more) disks. If the specific calls for a specific disk size, definitely create another disk – either thick or thin provisioned. For large footprints, eager zero is preferred, but lazy zeroed is fine for a micro-instance.

6) Edit the VM settings (tick box) and click continue. Modify the settings as follows:
- Memory: 2048MB is the default. For a micro-instance, this can be reduced to as low as 1024MB – particularly if you don’t plan on a GUI (which you shouldn’t anyway).
- CPUs: 2 virtual sockets with 1 core per socket for micro-instance or medium. Increase only as required by application. By choosing 2 cores, SMP will be installed in the kernel. You can reduce it to one later, but make sure there are at least two at installation time.
- Video Card: Leave at 4MB with 1 display unless you need a GUI. Then increase to 12MB.
- CD/DVD: Set to the CentOS NetInstall or MinimalInstall ISO you added earlier. Check ‘Connect at power on’.
- Floppy: Remove

7) Click ‘Finish’
8) Select newly created server in the client, connect to the console and power on.

There should be no need to test the media, so just select ‘Install Centos’. The CentOS installer will then boot:

CentOS Installation (GUI)
1) Language: Select English and your location in the world. In my case, this is Australia.

2) Installation Summary: You will need to modify ‘Date/Time’, ‘Security Policy’, ‘Installation Source’, ‘Installation Destination’ and ‘Network and Host Name’. Since this is a Net Install, we need to modify the Network and Hostname first.

3) Network and Hostname. Enable the network adapter. This will perform an automatic DHCP. Unless you plan on using DHCP for your servers, you should change this to a static address. Change the hostname to the FQDN of the server.

Use the configure button to change the name of the adapter to something easier to remember. You can also change the MAC address here. This is useful if you are creating an immutable server. Under the ‘General’ tab, select “Automatically connect to this network when it is available”. Set the IPv4 address and DNS settings. Add IPv6 if utilised. Click ‘Save’ and then ‘Done’ when finished.


4) Installation Source: Enter the Centos mirror address and uncheck the mirror list checkbox. Click done and CentOS will begin updating its repository list.

5) Software Selection: I know this is tempting to select what you want here, but stick with the minimal install for now. The only time you really should select anything is if you are installing a compute node or virtualization host.

6) Installation Destination: For a micro-instance, you can settle for the defaults. This will create two physical partitions. The first (sda1) will be a 1GiB boot partition formatted for xfs (the default now under CentOS7). You can change this to ext4 if you like. The second physical partition will use LVM (Logical Volume Management) with two LVM partitions made up of a 1.5GiB swap partition and the rest allocated to root. For simple servers, this will be adequate. Otherwise, modify it here according to the size/space/capability recommendations. Everything here is completely customisable.


8) Lastly, we will need to select a security policy. This is an area often overlooked and most installations will choose the default XCCDF profile which contains no rules, although rule lists can be downloaded and applied here. Unless mandated otherwise, use the Standard System Security Profile. The security profiles are administered by Red Hat and not even vetted by CentOS. You will need to consult RHEL documentation for details. In brief, it contains thirteen rules to ensure a basic level of security compliance.
There is a HUGE caveat with the use of security policies: They are something of a black art and emphasise security above all else. This can result in unpredictable changes to your system without notification.
If you want to harden the CentOS setup, I’ll deal with that later. For now, just select the Standard Profile.
Note: There is a bug with the 7.3.1611 ISO with all four STIG security policies that has been fixed with 7.4.1708. Security profiles "Standard System Security Profile" and "C2S for CentOS Linux 7" can't be used in the CentOS 7.5.1804 installer. A bug causes the installer to require a separate partition for /dev/shm, which is not possible.
We could spend hours here. We won’t. That will come with server hardening - when we get to it.

9) Next, click ‘Begin installation’ and installation will start. The next page will work concurrently with the installation.

Set the root password to something long a difficult but easy to remember. Make it at least 15 characters by using a phrase with upper/lowercase and numbers eg: 1veGot4LovelyBunch0fCoconuts. Store this password in a secure place (eg keysoft secured by two factor authentication). You will only need this password once and in case of emergencies.

The second user should be your account or a GP admin user. Make sure the password used is strong.

Once installed, select ‘Reboot’. You should disconnect the ISO at some point. Once the server has booted, you will be greeted with the CLI login screen:

If you want to harden the CentOS setup, I’ll deal with that later. For now, just select the Standard Profile.
Note: There is a bug with the 7.3.1611 ISO with all four STIG security policies that has been fixed with 7.4.1708. Security profiles "Standard System Security Profile" and "C2S for CentOS Linux 7" can't be used in the CentOS 7.5.1804 installer. A bug causes the installer to require a separate partition for /dev/shm, which is not possible.
We could spend hours here. We won’t. That will come with server hardening - when we get to it.

9) Next, click ‘Begin installation’ and installation will start. The next page will work concurrently with the installation.

10) Create a root user and a normal (administrative) user. Ideally, you will only ever use the root login once. After that we will disable root logins completely except from the console. To gain root privileges, you will need to elevate them using sudo by placing administrative users in the ‘wheel’ group (more on that later).
Set the root password to something long a difficult but easy to remember. Make it at least 15 characters by using a phrase with upper/lowercase and numbers eg: 1veGot4LovelyBunch0fCoconuts. Store this password in a secure place (eg keysoft secured by two factor authentication). You will only need this password once and in case of emergencies.

The second user should be your account or a GP admin user. Make sure the password used is strong.

Once installed, select ‘Reboot’. You should disconnect the ISO at some point. Once the server has booted, you will be greeted with the CLI login screen:

At this point, the installation is complete! Login with your admin user and proceed to configuration.
Tomorrows blog entry will deal with configuration.
Tomorrows blog entry will deal with configuration.
Previously used an automatic installation feature... Thanks for the guide!
ReplyDelete