Part of the brief was also that users shouldn't have to type a code in when printing. The workstation must magically know which department and code to use for each user. From my perspective, it's also handy to be able to print from Linux. This blog covers two parts: the Windows side and the Linux side.
Printing from Windows
The windows driver for these printers is very nice. Since the site for implementation was a Windows site, a Windows print server was setup - that much was pretty basic. There were spare licences for Windows Server 2003 R2, so that was used. I also setup IIS with printer integration so the printers could be browsed, monitored and added manually from within ie. Again all very basic. Now the question of the printer codes.
My original thought was to distribute the codes at driver installation time, however the problem with that is it won't work because the codes are encrypted within the registry. The only real way to do it is via a registry hack after determining what the hash value really is.
The first step was to determine the hash values. For this, I cheated. I manually entered the code in the driver, saved, then copied the DWORD key and value from the registry into a text editor.
Now, I hate hacks in production, so I caught upon the idea of using an adm template and setting the user codes within group policy. It would be very neat and pretty. I spent about two days researching adm templates (not my strong suit) and built an adm template for one printer with two test codes and tried it out.
Guess what? It didn't work. Nothing. Nada. Zip.
This is the adm template I built:
CLASS USER
CATEGORY Sharp_Printer_Codes_(CustomADM)
POLICY User_Code
EXPLAIN !!SharpCodeHelp
KEYNAME Software\SHARP\smvps01\pmvad-L1\printer_ui\job_control
PART !!User_Code DROPDOWNLIST REQUIRED
VALUENAME "account_number"
ITEMLIST
NAME !!None VALUE "00,00,00,00" DEFAULT
NAME !!Audio VALUE "b1,d0,7d,34,d7,b0,82,6c,44,53,ad,a5,1d,01,58,45,00,00,00"
NAME !!IT VALUE "50,9d,67,fa,39,8b,9b,17,10,5c,c9,ac,a7,ac,98,50,00,00,00"
END ITEMLIST
END PART
END POLICY
END CATEGORY
[strings]
SharpCopierCodesCustomADM="User Codes for Sharp Copiers"
User_Code="Set the Sharp Copier User Code to: "
None="No Code"
Audio="Audio - 32147"
IT="IT - 25896"
; explains
SharpCodeHelp="You can set the User Code for the Sharp Multifunction Copier from here. Users can still change it but it will revert when group policy refreshes. This ADM was created by Wayne Doust."
After much searching I found out why it didn't work. DWORD values are not supported in adm templates!!! Why? I don't know. To me this is a major drawback to using adm templates for anything for apparently no justifiable reason. What this means is the only solution is to use registry hacks.
To make it more elegant, I created two sets of groups. One set of groups was the "Print-dist" groups. For every geographical location of printers I created one. Mostly this was a one-one relationship between the group and the printer, sometimes two or three.
The second set of groups was the "Print-code" group which contained all of the users using a particular printer code to print.
Where possible, the groups were hierarchical: For example, the pc-audio group has the audio department as its one and only member.
Thirdly, I created the registry hacks for each printer code as follows:
Windows Registry Editor Version 5.00
[HKEY_CURRENT_USER\Software\SHARP\smvps01\pmvad-L1\printer_ui\job_control]
"use_account_number"=dword:00000001
"set_login_name"=dword:00000000
"set_login_pass"=dword:00000000
"login_name"=""
"login_pass"=hex:00
"account_number"=hex:50,9d,67,fa,39,8b,9b,17,10,5c,c9,ac,a7,ac,98,50,00,00,00,\
00,00,00,00,00,00,00,00,00,00,00,00,00,00,00,00,00,00,00,00,00,00,00,00,00,\
00,00,00,00,00,00,00,00,00,00,00,00,00,00,00,00,00,00,00,00,00,00,00,00,00,\
00,00,00,00,00,00,00,00,00,00,00,00,00,00,00,00,00,00,00,00,00,00,00,00,00,\
00,00,00,00,00,00,00,00,00,00,00,00,00,00,00,00,00,00,00,00,00,00,00,00,00,\
00,00,00,00,00,00,00,00,00,00,00,00,00,00,00,00,00,00,00,00,00,00,00,00,00,\
00,00,00,00,00,00,00,00,00,00,00,00,00,00,00,00,00,00,00,00,00,00,00,00,00,\
00,00,00,00,00,00,00,00,00,00,00,00,00,00,00,00,00,00,00,00,00,00,00,00,00,\
00,00,00,00,00,00,00,00,00,00,00,00,00,00,00,00,00,00,00,00,00,00,00,00,00,\
00,00,00,00,00,00,00,00,00,00,00,00,00,00,00,00,00,00,00,00,00,00,00,00,00,\
00,00,00,00,00,00,00,00,00,00,00,00
"use_PIN"=dword:00000000
"folder_index"=dword:00000000
"use_user_name"=dword:00000000
"use_job_name"=dword:00000000
"user_name"=""
"job_name"=""
"pin"=hex:00
"folder_pass"=hex:00
The hack was repeated for each and every printer (just in case). The registry hack is initiated from the login script, however you can use a user group policy if that floats your boat. In my case, I used kickstart scripts as follows:
? "Setting up Print Codes"
IF Ingroup ("PrintCode-Audio")
? "Set Audio Print Code"
run "regedit /s \\<domain>\netlogon\sharp\pc-audio.reg"
Distributing the printers is done via pushprinterconnections.exe. The print-dist groups are matched on a one-one relationship to group policy objects with the same name by adding the group to the "Security Filtering" section of the GPO. From within the Print Management tool on the Print Server, select the printer and "Deploy with Group Policy" and choose the appropriate print-dist policy as shown below:

The final step in this process is to run "pushprinterconnections.exe" either from the login script or in Group Policy (again according to preference). If you add the switch "-log" it will log the results of the printer distribution to the local workstation. These can also be harvested (if desired) to determine the success or failure rate of printer driver installations.
Although it is preferable to install the printer before pushing out the registry hack, it isn't necessary to do so.
Printing from Linux
I'm quite impressed with the Sharp driver for Linux. It offers very similar functionality to the Windoze driver except it lacks the bi-directional communications component - which means you have to manually tell the driver what optional features the printer has. It also annoyingly misses one important feature - the ability to use user codes!
After a lot of searching, I found a hack for it. Credit to nipquad and eric71 for pointing me in the right direction. You need to edit the supplied ppd file BEFORE installing the driver (you can do it later, but that's a little messier). The original examples I worked from were in Spanish, which I left unchanged just in case there was some dependency in the spelling. It looks like there isn't, so you should be okay to convert back to English. However, I found searching for 'numero' rather than 'number' was invaluable for debugging. :-)
Edit the ppd file for the printer you want to install (located in a tarball) and find the section labelled "Constraints" and add the following immediately before that section:
*% ====================================================================
*% Account number
*JCLOpenUI *JCLMXaccount/numero: PickOne
*OrderDependency: 80 JCLSetup *JCLMXaccount
*DefaultJCLMXaccount: A25896
*JCLMXaccount A25896/25896: "@PJL SET ACCOUNTNUMBER=<22>25896<22><0A>"
*JCLCloseUI: *JCLMXaccount
*% ====================================================================
In my case the default number is "25896". The number you put here doesn't matter that much (as long as it works); once the printer is installed, the number can be changed.
Save the file back into the tarball. If you intend to use more than one model of printer, modify all that you will use. In Ubuntu, the ppd files will be copied on driver installation to /usr/share/cups/model/sharp/en, however ymmv.
Install the driver using "sudo ./mx-c26-ps.install", it will spawn the following GUI installer:


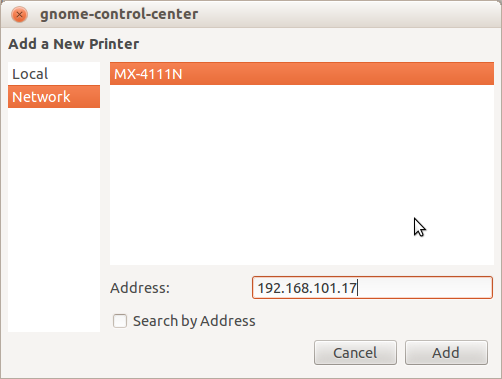
Next, use CUPS to search for and add the printer:
Once Added, you can edit the properties:

If all is working, you will have your "numero" field. Do a test print to check the code is working.

PPD files are reasonably open-ended. There's not much to stop you from adding just about any feature this way - as long as the printer supports it.