Showing posts with label Linux. Show all posts

Thursday, 7 December 2023

Multi-Factor Authentication (MFA) over ssh

Free OTP MFA
Securing your internet-facing systems and data is of utmost importance. One critical aspect is ensuring secure access to your servers and protecting them from unauthorised access. Multi-Factor Authentication (MFA) adds an additional layer of security by requiring users to provide two or more pieces of evidence to authenticate themselves. In this tutorial, we will explore how to set up MFA for SSH using FreeOTP, an open-source OTP (One-Time Password) authenticator app.

Prerequisites

Before we begin, make sure you have the following:

  1. A Linux server (Ubuntu, CentOS, or any other distribution)
  2. Administrative access to the server
  3. A smartphone (iOS or Android) to install the FreeOTP app

Step 1: Installing FreeOTP

  1. On your smartphone, open the respective app store (Google Play Store or Apple App Store).
  2. Search for "FreeOTP" and install the app.
  3. Once installed, open the FreeOTP app.

Step 2: Configuring SSH for MFA

  1. Connect to your server using SSH with administrative privileges.
  2. Open the SSH configuration file using a text editor (e.g., nano or vi).
    •  sudo vi /etc/ssh/sshd_config

  3. Look for the ChallengeResponseAuthentication line and set it to "yes" if not already enabled.
  4. Add the following line to enable the use of Google Authenticator-compatible TOTP (Time-based One-Time Password) authentication:
    AuthenticationMethods publickey,password publickey,keyboard-interactive
  5.  Save and exit the SSH configuration file.

Step 3: Configuring the User for MFA

  1. In the SSH configuration file, find the Match User or AllowUsers section for the user you want to enable MFA for.
  2. Add the following line below the user entry:
    AuthenticationMethods publickey,password publickey,keyboard-interactive
  3. Save and exit the SSH configuration file.

Step 4: Restarting the SSH Service

  1. Restart the SSH service to apply the changes.
    • sudo systemctl restart sshd

Step 5: Enabling MFA for the User

  1. On your server, generate a secret key for the user using the following command:
    google-authenticator
  2. You will be presented with a series of prompts. Answer "y" for each of them to configure MFA.
  3. Scan the displayed QR code using the FreeOTP app on your smartphone.
  4. FreeOTP will add your server as a new account and start generating one-time passwords.
  5. Complete the setup process by following the on-screen instructions.

Step 6: Testing the MFA Setup

  1. Attempt to SSH into your server using the user account that has MFA enabled.
  2. After entering the username and password, you will be prompted for the verification code.
  3. Open the FreeOTP app on your smartphone and find the account associated with your server.
  4. Enter the current one-time password generated by FreeOTP.
  5. If the authentication is successful, you will gain access to your server.

By implementing MFA for SSH using FreeOTP, you have taken a significant step towards bolstering the security of your server. MFA provides an additional layer of protection against unauthorised access and greatly reduces the risk of compromised user credentials. Remember to enforce strong passwords and regularly update your system to maintain a robust security.

In future tutorials (when I get the time) I will show how to further harden your system with fail2ban and geoblocking.

Tuesday, 23 August 2022

Ubuntu Server Runup Script

Ubuntu Server post-installation runup script
Ubuntu Server Post Installation Runup

Following on from my CentOS 7 runup script is a series of Ubuntu scripts I have written over time. They're presented as a "Work in Progress" which may or may not end. 

I started the Ubuntu scripts using the CentOS scripts as a base, however they diverged quickly to become both unique and specialised. With Ubuntu, the goal was to standardise server builds so they could be duplicated by others. So the scripts began to evolve into a partially menu based build system.

But as I said - it's a work in progress, and the comments reflect areas that need improvement. So, for better or worse, here's the best of about two dozen iterations.

Base Ubuntu 20.04 LTS Runup Script

The script follows after the commentary given here. The script was designed to be edited before use. It is divided loosely into several sections. While some parts have been improved to be interactive, the majority requires serious modification before you should even think of running it on a server.

1. Variables

The first section includes many variables. Most should be self-explanatory. Check these carefully and make any modifications you need. Only those variables used in sections you are using need to be used, the rest can be commented out. In particular, make sure the following is properly declared:

MAILFWD IP address of the email relay

EMAILINST Your email address
EMAILADMIN The server administrators email address
SNMPRO The SNMPv2 public community
SNMPRW The SNMPv2 private community
SNMPSRV IP address of the SNMP server

2. Updates & Cockpit

Next updates are applied and cockpit is installed. This will take a few minutes to run. Choose between cockpit and webmin - do not install both. Cockpit has a smaller footprint and is easier to use, but webmin is more versatile.

3. Active Directory Integration

If you are integrating with Active Directory, study this section carefully as it is a little buggy and doesn't trap a lot of exceptions. I'd welcome feedback here!

4. PCP Logging tools & Grafana

This section is very experimental. Use with care. Grafana is a powerful tool that is not utilised enough. However it does take significant time to configure.

5. Firewall & Fail2ban

UFW (Uncomplicated Firewall) is then setup to allow access to ssh and cockpit. Rate limiting is applied to ssh. Fail2ban is also installed.

6. Swap

Default swappiness for Ubuntu server is 60. This is way too high. This section changes it to 20. This is a simple change, but an important one.

7. Tools

Several system utilities are installed here. Comment or uncomment according to what you find useful. The utilities are:

  • wget - get files via http

  • telnet - telnet client
  • bind9utils - utlities for querying dns (such as dig)
  • nmap - network analysis tool
  • mlocate - Faster and more efficient file locator
  • mc - Midnight Commander (XTree like file system interface)
  • elinks - Text based broswer (has dependencies)
  • systat - Statistical tools such as iostat

8. vm-tools & hyper-V

VMWare tools are installed next. Comment this section if not using vmware. An adjacent section for Hyper-V is provided to enable LIS and enhanced session mode.

9. Mail Relay

This section sets up s-nail for sending email via an email relay defined previously. S-nail is the preferred mailer for Ubuntu and provides the same service that mailx does.

10. SNMP (incomplete)

Install snmpd. This section is not finished. The snmpd.conf file must be manually edited.

11. Unattended updates (incomplete)

Ubuntu server installs updates automatically by default. This section must be configured to provide notification and control over the update process. The config files need to be manually edited afterwards as this section still needs some work.

12. Webmin

Webmin is still the best server application administration tool. There are hundreds of plugins for webmin. Cockpit is the best tool for system administration. If you don’t need webmin, comment out these lines. If you do, you may want to consider commenting out the cockpit installation lines to have just one tool.

Next we have the server applications

13. VSFTP

If you need ftp, this is the version to use. The downside is there is no webmin plugin for it. If you really need to administer ftp via webmin, install proftpd instead. If you don’t need an ftp server, comment out this section.

14. MariaDB (MySQL Server)

This will install mariadb server and client and harden the service. This section is interactive.

15. PERL

PERL is required for many web based applications. If not required, comment this section. This section is highly interactive and takes several minutes to install. As well as installing PERL, it installs cpan, cpan minus and numerous perl modules and keeps them updated as much as possible. Error messages in this section are not unusual. Ignore them.

16. Apache

Installs the Apache 2.4 web server. Configuration of httpd.conf is required. Comment out if installing NGINX.

17. PHP for Apache

Installs basic php modules and PEAR. Other modules can be installed by uncommenting as required.

18. NGINX

Installs NGINX instead of Apache.

19. WordPress

Requires Apache. Some heavy editing foo required here or you will be unhappy with the result...

20. phpMyAdmin

If you don't know what this is for, don't install it. 

21. Security evaluation

This section installs security evaluation and reporting tools and prepares a security report for the system.

22. Finish

Final section cleans up and reboots.

The Future

Plans for updates to the post-installation script include:

  1. Make it interactive, so you don’t have to edit the file before running it.

  2. Add logging to file.

  3. Add auto-document capability. This will be the basis for as-built documentation.

  4. Add a silent unattended mode.

The Script

#!/bin/bash
#
# Post installation script for Ubuntu Server 20.04 LTS
#
# Written by Wayne Doust 02 September 2021
#

## Needed for ifconfig to work
apt -y -qq install net-tools

SCTL="/etc/sysctl.conf"
STAMP=`date +%Y%m%d`
SWPP=20
HOST=`hostname -s`
FQDN=`hostname -d`
FQDN=site.local
MAILFWD=<IP of email forwarder>
EMAILINST=installer@$FQDN
EMAILADMIN=admin@$FQDN
SNMPRO=public
SNMPRV=private
SNMPSRV=<IP of SNMP server>
ALLOWFRM="127.0.0.0/8, 10.0.0.0/8, 100.64.0.0/10, 169.254.0.0/16, 192.168.0.0/16, 172.16.0.0/12, ::1/128, fc00::/7, fe80::/10"
ADDOM=ADdomainname
ADFQDN=ADFQDN
ADUSER=Administrator


IP4="`ifconfig | sed -En 's/127.0.0.1//;s/.*inet (addr:)?(([0-9]*\.){3}[0-9]*).*/\2/p'`"
#IP6="`ifconfig | sed -En 's/::1//;s/.*inet6 (addr:)?(([[:xdigit:]]*::){,4}[[:xdigit:]]*::{,4}[[:xdigit:]]*::{,4}[[:xdigit:]]*::{,4}[[:xdigit:]]*).*/\2/p'`"

###
### The Following section asks for user input to modify some of the above variables
###
clear
echo
echo Ubuntu Server 20.04 LTS Runup Script
echo =========================================================================
echo
echo Enter parameters of this server. Press enter to accept the default.
echo
printf "Hostname [%s]:" $HOST
read ANSWER
if [ "$ANSWER" != "" ]
then
    HOST=$ANSWER
fi
echo Hostname: $HOST

printf "Domain [%s]:" $FQDN
read ANSWER
if [ "$ANSWER" != "" ]
then
    FQDN=$ANSWER
fi
echo Domain: $FQDN

echo Continuing will commence post-installation work of Ubuntu Server
echo ----------------------------------------------------------------
echo
echo Press any key to continue
read ANSWER

### Set Timezone and hostname
## Should use variables here
timedatectl set-timezone Australia/Melbourne
hostnamectl set-hostname $HOST
echo $HOST.$FQDN > /etc/hostname
sleep 3

### Apply updates and install cockpit & optionally pcp
## Note: Whilst you can install both, pick either Cockpit or webmin
##
echo
echo Apply updates
echo
sleep 3
apt -y -qq update && apt -y -qq upgrade
#echo
#echo Installing cockpit
#echo
#sleep 3
#apt -y -qq install cockpit
#apt -y install cockpit-pcp
#systemctl enable cockpit
#systemctl start cockpit

### (Optional) Add server to Actice Directory Domain
echo "deb http://au.archive.ubuntu.com/ubuntu/ bionic universe" >> /etc/apt/sources.list
echo "deb http://au.archive.ubuntu.com/ubuntu/ bionic-updates universe" >> /etc/apt/sources.list
hostnamectl set-hostname $HOST.$ADFQDN
hostnamectl
echo Check Name servers are correct
cat /etc/resolv.conf | grep nameserver
echo
sleep 10
systemctl disable systemd-resolved
systemctl stop systemd-resolved
apt -y update
apt -y install realmd libnss-sss libpam-sss sssd sssd-tools adcli samba-common-bin oddjob oddjob-mkhomedir packagekit
echo
echo Discover AD Domain
echo
realm discover $ADDOM
realm join -U $ADUSER $ADDOM
realm list $ADDOM
pam-auth-update --enable mkhomedir
## Do the following if the previous line doesn't work
#cp /usr/share/pam-configs/mkhomedir /usr/share/pam-configs/mkhomedir.org
#echo "Name: activate mkhomedir" > /usr/share/pam-configs/mkhomedir
#echo "Default: yes" >> /usr/share/pam-configs/mkhomedir
#echo "Priority: 900" >> /usr/share/pam-configs/mkhomedir
#echo "Session-Type: Additional" >> /usr/share/pam-configs/mkhomedir
#echo "Session:" >> /usr/share/pam-configs/mkhomedir
#echo "        required                        pam_mkhomedir.so" >> /usr/share/pam-configs/mkhomedir
#echo "umask=0022 skel=/etc/skel" >> /usr/share/pam-configs/mkhomedir
pam-auth-update
systemctl restart sssd
realm permit $ADUSER@$ADFQDN
realm permit 'Domain Admins' 'sysadmins'
echo "$ADUSER@$ADFQDN    ALL=(ALL)    ALL"          > /etc/sudoers.d/domain_admins
echo "%Domain\ Admins@ADFQDN    ALL=(ALL)    ALL"     >> /etc/sudoers.d/domain_admins
echo "%sysadmins@ADFQDN    ALL=(ALL)    ALL"         >> /etc/sudoers.d/domain_admins

### Optional logging tools based around pcp
## Don't install these unless you know what you're doing
# apt -y install pcp
# systemctl enable pmcd
# systemctl start pmcd
# systemctl enable pmlogger
# systemctl start pmlogger
# systemctl enable pmie
# systemctl start pmie
## use 'pcp atop' 'pmstat' 'pmiostat' etc
## Following is for web API for Grafana
# systemctl enable pmproxy
# systemctl start pmproxy
# wget -q -O - https://packages.grafana.com/gpg.key | sudo apt-key add -
# add-apt-repository "deb https://packages.grafana.com/oss/deb stable main"
# apt update
# apt -y install grafana
# systemctl enable grafana-server
# systemctl start grafana-server
# ufw allow 3000/tcp
## Securing Grafana using NGINX Reverse Proxy (more here)
## See https://www.digitalocean.com/community/tutorials/how-to-install-and-secure-grafana-on-ubuntu-20-04

    
### Setup ufw
echo
echo Setting up UFW
echo
sleep 3
ufw default deny incoming
## Allow SSH
ufw allow ssh
ufw limit ssh
## Allow cockpit
#ufw allow 9090/tcp
echo y | ufw enable
ufw status

### Install fail2ban
echo
echo Installing fail2ban
echo
sleep 3
apt -y -qq install fail2ban
#configure fail2ban as required

### Change Swappiness from 60 to 20
## Need to add check for current value in config file
## This could be done better
echo
echo Change swappiness to 20
echo
sleep 3
printf "\nCurrent swappiness="
cat /proc/sys/vm/swappiness
cat $SCTL | grep swappiness | sed -e 's/[^0-9]//g'
echo Current setting=$CSWP
echo Swap Details
echo ------------
swapon --show
sleep 3
printf "\n"
echo 20 > /proc/sys/vm/swappiness
if [ -e $SCTL.org ];
then
    cp -p $SCTL $SCTL.$STAMP;
else
    cp -p $SCTL $SCTL.org;
fi
echo "" >> $SCTL
echo "#Set swappiness to $SWPP" >> $SCTL`
echo "vm.swappiness = $SWPP" >> $SCTL`

### Install useful tools
## wget       - get files via http
## telnet     - telnet client
## bind9utils - utlities for querying dns (such as dig)
## nmap       - network analysis tool
## mlocate    - Faster and more efficient file locator
## mc         - Midnight Commander (XTree like file system interface)
## elinks     - Text based broswer (has dependencies)
## systat     - Statistical tools such as iostat
echo
echo Installing tools
echo
sleep 3
apt -y -qq install wget telnet bind9-utils nmap mlocate mc sysstat
apt -y -qq install elinks

### Install VMware tools if running on VMware
apt -y -qq install open-vm-tools
vmware-toolbox-cmd -v

## ALT: Install Hyper-V LIS if running on Hyper-V
#echo -e "hv_vmbus" >> /etc/initramfs-tools/modules
#echo -e "hv_storvsc" >> /etc/initramfs-tools/modules
#echo -e "hv_blkvsc" >> /etc/initramfs-tools/modules
#echo -e "hv_netvsc" >> /etc/initramfs-tools/modules
#apt -y install linux-virtual linux-cloud-tools-virtual linux-tools-virtual
#update-initramfs -u
## ALT: Install Hyper-V Enhanced Session Mode (xRDP)
## See https://www.kali.org/docs/virtualization/install-hyper-v-guest-enhanced-session-mode/
#apt -y install git
#git clone https://github.com/Microsoft/linux-vm-tools.git ~/linux-vm-tools
#cd ~/linux-vm-tools/ubuntu/
#chmod +x install.sh
#./install.sh
##edit /etc/xrdp/xrdp.ini Change port=vsock://-1:3389 to use_vsock=false
#systemctl enable xrdp.service
#systemctl start xrdp.service
## On host in Admin PS: Set-VM -VMName <vmname> -EnhancedSessionTransportType HvSo

### Setup email relay
echo
echo Setup email relay
echo
sleep 3
apt -y -qq install s-nail
ln -s /usr/bin/s-nail /bin/email
## This next bit could be done better
echo -e "set mta=smtp://$MAILFWD " >> /etc/mail.rc
echo -e "set mailx-extra-rc=/etc/mail.rc" >> /etc/s-nail.rc
echo 'Testing Email relay' | s-nail --subject='Email test 1'  -r "$HOST<$HOST@$FQDN>" $EMAILINST

### Setup SNMP (Not finished)
echo
echo Setup SNMP
echo
sleep 3
apt -y install snmpd snmp
ufw allow snmp
ufw status
#add lines for editing /etc/snmp/snmpd.conf
#change rocommunity public ro6community public etc
#SNMPDOPTS='-LS 0-4 d -Lf /dev/null -p /var/run/snmpd.pid'
cp /etc/snmp/snmpd.conf /etc/snmpd.conf.org
systemctl enable snmpd
systemctl restart snmpd
systemctl status snmpd
snmpwalk -v 2c -c $SNMPRO localhost

### Setup Unattended Updates (Not finished)
echo
echo Setup unattended updates
echo
sleep 3
apt -y -qq install unattended-upgrades
dpkg-reconfigure -plow unattended-upgrades ### Requires intervention
apt-config dump APT::Periodic::Unattended-Upgrade
cat /etc/apt/apt.conf.d/50unattended-upgrades | grep -v '//' | grep '[A-Aa-z]'
apt -y -qq install apt-listchanges
sed -i "/\b\(Unattended-Upgrade\:\:Mail\)\b/d" /etc/apt/apt.conf.d/50unattended-upgrades
echo -e "Unattended-Upgrade::Mail \"$EMAILADMIN\";" >> /etc/apt/apt.conf.d/50unattended-upgrades

### Install Webmin
## If using cockpit, comment this section out
## This also could be done better
echo
echo Installing Webmin
echo
sleep 3
apt -y install wget apt-transport-https software-properties-common
wget -q http://www.webmin.com/jcameron-key.asc -O- | sudo apt-key add -
add-apt-repository "deb [arch=amd64] http://download.webmin.com/download/repository sarge contrib"
apt -y install webmin
ufw allow webmin
ufw limit webmin

###
### Application Section
###

### Install, secure and run MySQL
##
#echo
#echo Installing MariaDB (MySQL)
#echo
#sleep 3
#apt -y install mariadb-server mariadb-client
# alternate install in case the above doesn't work
#apt -y install mariadb-client-10.3
#apt -y install mariadb-server-10.3
# Secure MySQL
#ufw allow mysql
#systemctl start mariadb
#mysql_secure_installation
#systemctl enable mariadb.service

### Install CPAN Minus and update PERL modules (some will fail on dependencies)
echo
echo Installing CPAN and PERL modules (This will take a while and requires interaction)
echo
sleep 5
apt -y install make
apt -y install libnet-ssleay-perl perl-IO-Zlib
cpan App::cpanminus
cpanm Net::FTPSSL
cpanm App::cpanoutdated
cpan-outdated -p | cpanm

### Install Apache web server (needs work)
echo
echo Installing Apache web server
echo
sleep 3
apt -y install apache2
apachectl -v
#<change httpd.conf listen to 0.0.0.0:80>
#be sure to set FQDN
ufw allow http
ufw allow https
ufw status
apachectl graceful
apachectl configtest

### Install PHP for Apache, MySQL and PEAR
echo
echo Installing PHP
echo
sleep 3
apt -y install php php-pear php-mysql
## Enable the following as required: Postgres, ODBC (MS SQL), LDAP, SOAP
#apt -y install php-pgsql php-odbc php-ldap php-soap
## Enable the following to install all PHP related development tools (this is a huge list > 60 packages)
## Only install this on test/dev servers. Don't install on stage, canary or prod servers.
#apt -y install pkg-php-tools
##
echo -e "<?php phpinfo(); ?>" > /var/www/html/info.php
# Test with http://server/info.php
systemctl restart httpd.service
## Setup dedicated Apache2 user

### Install NGINX instead of Apache (Needs lots more work)
#echo
#echo Installing NGINX
#echo
#sleep 3
#apt -y install nginx php php-common php-fpm
## Install as required
#apt -y install php-cli php-json php-pdo php-mysql php-zip php-gd php-mbstring php-curl php-xml php-pear php-bcmath
#ufw allow 'nginx http'
#ufw allow 'nginx https'
#ufw reload
#systemctl stop httpd
#systemctl stop apache2
#systemctl disable --now httpd
#systemctl disable --now apache2
#systemctl enable nginx
#systemctl start nginx  
#nginx -v
#nginx -t
#mkdir -p /var/www/<website>/public_html
#mkdir /var/www/<website>/logs
#chown -R nginx:nginx /var/www/<website>
## edit /etc/nginx/sites-available/default

### Install Wordpress (assumes Apache)
#echo
#echo Installing WordPress
#echo
#sleep 3
#apt -y install php-gd
#systemctl restart httpd.service
#wget http://wordpress.org/latest.tar.gz
#tar xzvf latest.tar.gz
#rsync -avP ~/wordpress/ /var/www/html/
#mkdir /var/www/html/wp-content/uploads
#chown -R apache:apache /var/www/html/*
## Setup WordPress Database
#mysql -u root -p <password>
#CREATE DATABASE wordpress;
#CREATE USER wordpressuser@localhost IDENTIFIED BY 'password'
#GRANT ALL PRIVILEGES ON wordpress.* TO wordpressuser@localhost IDENTIFIED BY 'password';
#FLUSH PRIVILEGES;
#exit
## Configure WordPress
#cd /var/www/html
#cat wp-config-sample.php | sed 's/database_name_here/wordpress/g' | sed 's/username_here/wordpressuser/g' | sed 's/password_here/password/g' > wp-config.php

### Installs phpMyAdmin
#echo
#echo Installing phpMyAdmin
#echo
#sleep 3
#apt -y install php-mbstring php-zip php-gd php-json php-myadmin
#cp /etc/phpMyAdmin/config.inc.php /etc/phpMyAdmin/config.inc.php.orig
## Harden PHPMyAdmin
#cat /etc/phpMyAdmin/config.inc.php.orig | sed -e 's/AllowRoot\'\]\ \=\ TRUE/AllowRoot\'\]\ \=\ FALSE/g' > /etc/phpMyAdmin/config.inc.php  
## Test with http://server/phpMyAdmin

###
### Add security compliance scanning to setup Script for Ubuntu 20.04
###
echo
echo Perform Security Evaluation
echo
sleep 3

##
## Apply updates and install openscap
##
apt -y -qq update && apt -y -qq upgrade
apt -y -qq install libopenscap8
apt -y -qq install ssg-base ssg-debderived ssg-debian ssg-nondebian ssg-applications

##
## Perform default and standard security policy compliance scans for Ubuntu 20.04
##
oscap xccdf eval /usr/share/xml/scap/ssg/content/ssg-ubuntu1604-ds.xml
oscap xccdf eval --profile xccdf_org.ssgproject.content_profile_standard /usr/share/xml/scap/ssg/content/ssg-ubuntu1604-ds.xml

##
## Perform CVE scans
##

snap install cvescan
cvescan -p all
cvescan -p all --show-links > cvescan.out
echo >> cvescan.out
touch cvescan.csv
cvescan --csv -p all > cvescan.csv
## Also add open ports to report
netstat -tulpn | grep LISTEN | grep -v 127.0.0. | grep -v ::1
netstat -tulpn | head -n 2 >> cvescan.out
netstat -tulpn | grep LISTEN | grep -v 127.0.0. | grep -v ::1 >> cvescan.out
echo >> cvescan.out
echo Firewall Status >> cvescan.out
echo >> cvescan.out
ufw status >> cvescan.out
echo >> cvescan.out

##
## Perform OVAL scan and generate report
##
wget -c https://security-metadata.canonical.com/oval/com.ubuntu.$(lsb_release -cs).usn.oval.xml.bz2
bunzip2 com.ubuntu.$(lsb_release -cs).usn.oval.xml.bz2
oscap oval eval --report report.html com.ubuntu.$(lsb_release -cs).usn.oval.xml
## Email the report
cat cvescan.out | s-nail --subject="Security Report for $HOST" -a report.html -a cvescan.csv -r "$HOST<$HOST@$FQDN>" $EMAILINST

##

## Remove security eval prodcuts
##
echo
echo Removing security scan software
echo
sleep 3
snap remove cvescan
apt -y -qq remove libopenscap8

###
### Finish installation
###
echo
echo Cleanup installation and reboot
echo
sleep 3
apt -y -qq update && apt -y -qq upgrade
apt -y -qq autoremove --purge
echo
echo Rebooting in 60 seconds
echo
sleep 10
shutdown -r +1 Server Rebooting in 1 minute
echo
echo
sleep 60

Tuesday, 9 November 2021

Configuring Evolution-EWS to connect to Exchange Online

Let me quickly get something off my chest:

I hate MS Exchange. 

I loathe it. There are few things I despise more. 

I would prefer almost any other integrated messaging system than it. The reasons why are far too long to go into here. It really deserves its own blog entry - which I may do some day.

Unfortunately, unless you are the decision maker for the organisation for which you work, or at least hold some good sway with your IT Steering Committee. You are probably stuck with it.

If your organisation is like most, you are probably migrating to Office 365 or have already done so. If Linux is your primary or preferred platform and you want to be able to receive your email, calendar etc. on your Linux desktop, this may be something of a problem. So, here's my explanation of how to use Evolution as your messaging client for Exchange Online using Exchange Web Services via evolution-ews.

What is "Exchange Web Services" (and why should I care)?

Exchange Web Services (EWS) is an application program interface (API) that allows programmers to access Microsoft Exchange items such as calendars, contacts and email. 

EWS first became available in Exchange Server 2007. It provides the ability to store, retrieve, move and modify email and related data for a single user, a group of users or an entire Exchange Server organisation on an Exchange server. EWS can be used to migrate Exchange data on-prem or to a third-party host in the cloud, or simply as an interface for a mail app or messaging client. Previously, if you wanted to do this you had to leverage Outlook Web Access (OWA).

As well as being available for On-prem editions of Exchange, EWS is available for Office 365, however that access is slightly different.

Evolution-EWS

Evolution-ews from 3.27.91 on has had the capability of connecting to office 365 with OAuth2 authentication. The administrator of the account must allow access via this method. Fortunately this is the default, so I suggest you don't mention it to your Exchange administrator as they may decide to block access.

Users of free accounts at live.com/hotmail.com/outlook.com addresses can also configure EWS account with the same Host URL, but they cannot use OAuth2, it's required to create an application specific password. Organisation accounts can use application specific passwords too, but administrators can disable this feature.
There are two existing application IDs, but the organisation administrators can create their own application and have everything under their control.

To be able to use OAuth2 with outlook.office365.com server an Application ID, which identifies the application which requests access to user data, and a Tenant ID, which basically identifies the organisation, are required.

First make sure everything is installed:

Ubuntu/Debian Instructions

sudo apt-get remove evolution
sudo apt-get update
sudo apt-get install evolution
sudo apt-get install evolution-ews

Note that the first line is there to remove the old version - which may not be up to date. This may not be necessary for you but YMMV.

CentOS/RedHat/Rocky instructions

sudo yum update
sudo yum install evolution
sudo yum install evolution-ews

If you are using DNF, replace 'yum' with 'dnf'

Finding your Tenant ID

Each organisation has assigned its directory (tenant) ID, which is used to identify the organisation when authenticating the user. How to find out the tenant ID is described here. A short walk-through is:

  1. login to https://portal.azure.com

  2. click the View button below Manage Azure Active Directory near the top of the page

  3. the Overview section (selected by default) shows a Tenant information where is the Tenant ID

It can be seen also when:

  1. login to https://portal.azure.com

  2. click the View button below Manage Azure Active Directory near the top of the page

  3. pick App registrations subsection

  4. click Endpoints at the top of the subsection

It opens a table, where can be seen OAuth 2.0 authorization endpoint (v2) and OAuth 2.0 token endpoint (v2). Evolution-ews uses

https://login.microsoftonline.com/$TENANT/oauth2/token

and

https://login.microsoftonline.com/$TENANT/oauth2/authorize
,

where the $TENANT is replaced with the same value as the Tenant ID from the above.

If you are a normal user and do not have the required permission to check in the portal.azure.com, you might find the tenant ID in your browser history. Search for URLs containing tenantId=........-....-....-....-.............

Copy this Tenant ID, it'll be used together with Application ID when configuring evolution-ews.

Choosing an Application ID

There are two unverified applications (for testing purposes). They are setup in a way that they can be used by the organisations, though, depending on the organisation settings, the administrators may or may not need to approve them first. These applications can be used with the organisation tenant ID or with the common (or left empty) tenant ID. Again, it depends on the actual organisation settings. 

  1. 20460e5d-ce91-49af-a3a5-70b6be7486d1 - has both EWS and Microsoft Graph API usages enabled, but the Graph API is not enabled (in evolution-ews 3.38.x) due to its incompleteness. The application identifies itself as GNOME Evolution. It's preferred in case the Graph API would be used in the future, thus the transition to it will be smooth.

  2. 751cf8be-ca07-484b-9308-fac4b9d85eff - has only the EWS protocol enabled. The application identifies itself as GNOME Evolution EWS.

  3. Users can also try application IDs shown at point 12 of this Microsoft page, like d3590ed6-52b3-4102-aeff-aad2292ab01c or ea5a67f6-b6f3-4338-b240-c655ddc3cc8e, with the Redirect URI set to urn:ietf:wg:oauth:2.0:oob and other values kept empty.

If your organisation has its own Application ID, use that one. If you are the administrator for your organisation, and want to create your own Application ID by following this link.

Evolution Instructions

Launch the Evolution application. If this is a new installation, follow the prompts below to configure your account. Otherwise, select the menu items File -> New -> Mail Account, click Next, then follow the prompts.

  • Enter your name and your primary SMTP address, uncheck Look up mail server details… and click Next
  • For Server Type, select Exchange Web Services
  • For Username, specify your email address
  • Change Host URL to https://outlook.office365.com/EWS/Exchange.asmx
    Click the Fetch URL button, providing your EID password when prompted. (If this doesn't work, don't worry, it can be done later). This will result in the OAB URL field being populated, which is the address from which the client can download a copy of the Offline Address Book.
  • Change Authentication to OAuth2 (Office365).
  • Make sure that Override Office365 OAuth2 settings is checked and populate the Tenant ID and Application ID fields as follows:
    • Tenant ID: your tenant ID
    • Application ID: choose from above
  • Finish the New Mail Account Wizard, and you will then be taken to the University’s login page. Authenticate with your EID credentials and perform Duo multi-factor authentication.

Configuring Evolution-EWS to connect to Exchange Online

Please note that the initial synchronization with your account may take an extended period of time if you have a large mailbox.

If you've used EWS previously, you would have noticed that credential management is handled by the Gnome settings under online accounts. With O365 this does not happen. I'm not sure why it's different - it may have something to do with how the data is presented via the App ID, but I'm only guessing here. If anyone knows, please enlighten me in the comments.

Acknowledgements

The following links were helpful to me and acted as source material:

https://sites.utexas.edu/glenmark/2021/02/01/how-to-setup-your-office-365-email-using-evolution-ews-linux/

https://wiki.gnome.org/Apps/Evolution/EWS/OAuth2

https://bugzilla.redhat.com/show_bug.cgi?id=972562

Sunday, 25 April 2021

CentOS 7 post installation script

automatic basic server runup tasks

I like automation. Anything I can do to speed up repetitious tasks is worth the effort. The following shell script is a work-in-progress. Each time I run up a server, I use this script to automate the post installation tasks. I just uncomment the sections I need and run the script. Parts of it take some time and require some human intervention, but usually that just involves pressing 'enter' a few times. The script doesn't do much in the way of hardening the server - that's the stuff of another blog entry.

To use the script, cut and paste it into an editor, make it executable and run it as root. Unfortunately sudo doesn't cut it for some steps. Make sure you uncomment the sections you need first. There are modifications in there for RHEL if you're using that instead of CentOS. I have created a version for CentOS 8, but the it now EOL at the end of this year, I figure it's a little pointless. If anyone wants it, just ask and I'll make it available.

Briefly, the script does the following things:
  1. Runs a yum update using deltas
  2. Adds the epel repository and optionally the remi repository
  3. Installs selinux utilities
  4. Installs PERL, CPAN and useful utilities for PERL.
  5. Installs Apache or NGINX
  6. Installs php for apache
  7. Optional upgrade for php 5.6 
  8. Installs webmin
  9. Installs vsftpd
  10. Installs and secures mysqld
  11. Installs vmtools
  12. Installs miscellaneous utilities
  13. Configure to remove old kernels automatically
  14. Setup email forwarding
  15. Setup and configure WordPress
As I runup more servers with different services, I will update and expand the script. I'm currently writing a GUI front end for the script in Xojo (see below) to customise and generate the script for any environment. If it works, I hope to expand it to include the ability to deploy the script remotely as well as generate it.


#!/bin/bash
## The following commands increase the number of packages available
##
yum -y update
yum -y install deltarpm
yum -y install epel-release
## Uncomment for REMI
# rpm -Uvh http://rpms.famillecollet.com/enterprise/remi-release-7.rpm
# yum --enablerepo=remi,remi-test

yum repolist
yum -y update

## RHEL instructions
# wget http://dl.fedoraproject.org/pub/epel/7/x86_64/e/epel-release-7-10.noarch.rpm
# rpm -ivh epel-release-7-10.noarch.rpm
# rpm -Uvh http://rpms.famillecollet.com/enterprise/remi-release-7.rpm
# yum --enablerepo=remi,remi-test
# yum repolist
# yum -y update

## Install SELinux utilities
##
yum -y install policycoreutils policycoreutils-python selinux-policy selinux-policy-targeted libselinux-utils setroubleshoot-server setools setools-console mcstrans

## Install PERL and useful modules and utilities via cpan and cpanm
##
yum -y install perl perl-Net-SSLeay perl-IO-Zlib openssl perl-IO-Tty cpan
cpan App::cpanminus
cpanm Net::FTPSSL
cpanm App::cpanoutdated
cpan-outdated -p | cpanm

## Install and start Apache Web server.
##
yum -y install httpd
#<change httpd.conf listen to 0.0.0.0:80>
systemctl enable httpd.service
systemctl start  httpd.service
systemctl status httpd.service
firewall-cmd --zone=public --permanent --add-service={http,https}
systemctl restart firewalld.service
firewall-cmd --list-all
apachectl graceful
apachectl configtest

## Install NGINX
##
# echo -e "[nginx]\nname=nginx repo\nbaseurl=http://nginx.org/packages/centos/$releasever/$basearch/\ngpgcheck=0\nenabled=1" > /etc/yum.repos.d/nginx.repo
# yum -y install nginx php php-common php-fpm
# firewall-cmd --zone=public --permanent --add-service={http,https}
# systemctl stop httpd
# systemctl disable httpd
# systemctl enable nginx
# systemctl enable php-fpm
# systemctl start nginx
# systemctl start php-fpm
# mkdir -p /srv/www/<website>/public_html
# mkdir /srv/www/<website>/logs
# chown -R nginx:nginx /srv/www/<website>

## Install PHP for Apache, mysql and MSSQL
##
yum -y install php php-pear  php-mysql
## Enable the following as required
# yum -y install php-pgsql php-odbc php-mssql php-ldap php-soap
# yum -y install phpmyadmin httpd-tools
# cp /etc/phpMyAdmin/config.inc.php /etc/phpMyAdmin/config.inc.php.orig
# Harden PHP
# cat /etc/phpMyAdmin/config.inc.php.orig | sed -e 's/AllowRoot\'\]\ \=\ TRUE/AllowRoot\'\]\ \=\ FALSE/g' > /etc/phpMyAdmin/config.inc.php

## Test with http://server/test.php
## Test with http://server/phpMyAdmin

## Upgrade to PHP 5.6 (optional)
##
#rpm -Uvh https://mirror.webtatic.com/yum/el7/webtatic-release.rpm
#yum repolist
#yum -y remove php-common
#yum -y update
#yum -y install php56w php56w-opcache php56w-xml php56w-mcrypt php56w-gd php56w-devel php56w-mysql php56w-intl #php56w-mbstring
#systemctl restart httpd.service
#php -v

systemctl restart httpd.service
echo -e "<?php phpinfo(); ?>" > /var/www/html/info.php
systemctl restart httpd.service

## Install and run Webmin administration (requires PERL)
##
echo -e "[Webmin]\nname=Webmin Distribution Neutral\nbaseurl=http://download.webmin.com/download/yum\nenabled=1" > /etc/yum.repos.d/webmin.repo
rpm --import http://www.webmin.com/jcameron-key.asc
yum -y install webmin
systemctl enable webmin.service
systemctl start  webmin.service
systemctl status webmin.service
firewall-cmd --zone=public --permanent --add-port=10000/tcp
firewall-cmd --reload
firewall-cmd --list-all

## Install and start VSFTPD
##
#yum -y install vsftpd ftp
#systemctl enable vsftpd.service
#systemctl start vsftpd.service
#firewall-cmd --zone=public --permanent --add-service=ftp
#systemctl restart firewalld.service
#firewall-cmd --list-all

## Install, secure and run MySQL
##
#yum -y install mariadb-server mariadb
#systemctl start mariadb
#mysql_secure_installation
#systemctl enable mariadb.service
#systemctl status mariadb.service

## Install tools for vmware
##
yum install open-vm-tools
vmware-toolbox-cmd -v

## Install Misc utilities as desired
##
yum -y install wget telnet bind-utils nmap mlocate mc
yum -y install elinks

## Remove old kernels and set yum to preserve only two. Setup auto updates
##
yum -y install yum-utils yum-cron
package-cleanup -y --oldkernels --count=2
echo -e "\ninstallonly_limit=2\n" >> /etc/yum.conf
#yum -y install yum-cron # edit /etc/yum/yum-cron.conf or do this via webmin instead on yum-cron
#systemctl start yum-cron
#systemctl enable yum-cron

## Setup email forwarding
##
yum -y install mailx
ln -s /bin/mailx /bin/email
echo -e "set smtp=smtp://<mail forwarding ip address> " >> /etc/mail.rc


## Install Wordpress
#yum -y install php-gd
#systemctl restart httpd.service
#wget http://wordpress.org/latest.tar.gz
#tar xzvf latest.tar.gz
#rsync -avP ~/wordpress/ /var/www/html/
#mkdir /var/www/html/wp-content/uploads
#chown -R apache:apache /var/www/html/*


## Setup WordPress Database
#mysql -u root -p <password>
#CREATE DATABASE wordpress;
#CREATE USER wordpressuser@localhost IDENTIFIED BY 'password'
#GRANT ALL PRIVILEGES ON wordpress.* TO wordpressuser@localhost IDENTIFIED BY 'password';
#FLUSH PRIVILEGES;
#exit

## Configure WordPress
#cd /var/www/html
#cat wp-config-sample.php | sed 's/database_name_here/wordpress/g' | sed 's/username_here/wordpressuser/g' | sed 's/password_here/password/g' > wp-config.php

Wednesday, 21 April 2021

Broken YUM on CentOS 7 (or how I learned to love DNF)

Yellowdog Update Modified

It's a simple thing to keep your system updated. A quick yum update every few days - just like brushing your teeth. Completely painless, quick, efficient.

Not today it wasnt.

---> Package screen.x86_64 0:4.1.0-0.26.20120314git3c2946.el7 will be updated
---> Package screen.x86_64 0:4.1.0-0.27.20120314git3c2946.el7_9 will be an update
---> Package skypeforlinux.x86_64 0:8.67.0.96-1 will be updated
---> Package skypeforlinux.x86_64 0:8.71.0.36-1 will be an update
Error: Invalid version flag: or

This was the error I received. Okay, so when yum update fails, there's always the tried and true command sequence that fixes it:

sudo yum clean all
sudo yum update --skip-broken

This time it didn"t work. I still received the same error. Time to google for more info... 

I found a kool command sequence on John S. De Stefano's blog that looked promising:

sudo yum check all                # tells you of any problems
sudo package-cleanup --problems   # lists all known package problems
sudo package-cleanup --dupes      # lists duplicate packages
sudo package-cleanup --cleandupes # actually cleans up duplicates
sudo yum check all                # run again to check for remaining problems
sudo yum-complete-transaction --cleanup-only

However, this command sequence failed to fix the issue too. Looks like I'm going to have to work out what's broken and why. No easy way out with this problem.

Rich Dependencies

Scrolling through bugzilla, I found the following entry:

There was a mistake made in the rpmlib() dep for rich deps. You need
at least rpm 4.13 for the base rich deps, and rpm 4.13.1 for the rest.

yum and related packages are no longer actively developed.
They are being replaced with dnf, dnf-utils, etc.

I'm closing this bug because it's most likely never going to be fixed.
If you still consider your bug report important, reopen it, please.
https://bugzilla.redhat.com/show_bug.cgi?id=1578942

This was actually a bug report for F28+. Since Fedora uses DNF primarily and YUM is deprecated, no one seemed particularly interested in fixing it in Fedora. RHEL/CentOS 8 both use DNF as well. Could this bug have percolated down into CentOS 7? Time to check rpm versions and make sure I have at least 4.13:

$ yum --showduplicate list rpm

Installed Packages
rpm.x86_64                          4.11.3-45.el7                          @base
Available Packages
rpm.x86_64                          4.11.3-45.el7                          base 

Well, that's just peachy!

I'm running an old version of rpm that doesn't support rich dependencies. It also appears that yum may not handle them well either - although the indications are the problem really lies with rpmlib().

I've never really spent a lot of time looking at the inner workings of package managers and their respective update managers. Now that ignorance is coming back to haunt me and it's time for some old fashioned studying the matter.

From rpm.org there's an excellent description of how the boolean operators work and how they help avoid dependency hell. This is what is being referenced in the error I received. The 'or' operator is unknown because my version of rpm is too old. Boolean operators enable what is termed "rich dependencies". Basically providing a logical sequence for resolving dependency issues across multiple versions. A good example is community-mysql and mariadb. Both packages do the same thing - provide a mysql style database. Without rich dependencies, if another package requires mysql, you have to choose which package is required. With rich dependencies you can state:

Package A: Requires: mysql
Package mariadb: Provides: mysql
Package community-mysql: Provides: mysql
Suggests: mariadb to Package A.

Which means that if community-mysql is already installed, that is used as the dependency, otherwise mariadb is installed.

This is really cool, but yum simply ignores it.

Put simply, the root cause of the problem is:

1. RPM supports "rich dependencies"
2. DNF supports resolving packages with "rich dependencies"
3. YUM does not support resolving packages with "rich dependencies"

The solution then is obvious: Since CentOS 7 supports DNF, it's time to switch. Fiddling with yum and manually resolving the dependencies will only delay the inevitable.

YUM vs DNF 

source

"Dandified YUM" or DNF, is the replacement package update manager for RHEL/CentOS. It's been part of Fedora for a long time now. I acknowledge it is clearly superior to YUM in most aspects, plus it doesn't suffer from some of the issues that Debian apt does. The major goal is to eliminate (where possible) dependency hell. But it also has other advantages.

It was also designed to be as drop-in replaceable to yum as possible. It comes very close, but some commands have no equivalent (some of these are deliberate actions). So, for me, if your used to using yum, dnf just represents yet another sequence of commands that must be memorised just to continue doing your job.

I'm not going to bore you with lists here of features, commands, comparisons etc. The links I've provided do that well enough. Plus, if you want a deep dive into dnf, you can go here. Suffice it to say that I decided that installing and using dnf was the simplest and most effect potential solution to the immediate and potentially long term problems.

Install DNF on CentOS7

Pretty simple really, however there are a number of dependencies since it leverages by Py2 and Py3. A total of 11 dependent packages were installed, however YMMV.

$sudo yum install dnf
...
Resolving Dependencies
--> Running transaction check
---> Package dnf.noarch 0:4.0.9.2-2.el7_9 will be installed
--> Processing Dependency: python2-dnf = 4.0.9.2-2.el7_9 for package: dnf-4.0.9.2-2.el7_9.noarch
--> Running transaction check
---> Package python2-dnf.noarch 0:4.0.9.2-2.el7_9 will be installed
--> Processing Dependency: dnf-data = 4.0.9.2-2.el7_9 for package: python2-dnf-4.0.9.2-2.el7_9.noarch
--> Processing Dependency: python2-libdnf >= 0.22.5 for package: python2-dnf-4.0.9.2-2.el7_9.noarch
--> Processing Dependency: python2-libcomps >= 0.1.8 for package: python2-dnf-4.0.9.2-2.el7_9.noarch
--> Processing Dependency: python2-hawkey >= 0.22.5 for package: python2-dnf-4.0.9.2-2.el7_9.noarch
--> Processing Dependency: libmodulemd >= 1.4.0 for package: python2-dnf-4.0.9.2-2.el7_9.noarch
--> Processing Dependency: python2-libdnf for package: python2-dnf-4.0.9.2-2.el7_9.noarch
--> Processing Dependency: python-enum34 for package: python2-dnf-4.0.9.2-2.el7_9.noarch
--> Running transaction check
---> Package dnf-data.noarch 0:4.0.9.2-2.el7_9 will be installed
---> Package libmodulemd.x86_64 0:1.6.3-1.el7 will be installed
---> Package python-enum34.noarch 0:1.0.4-1.el7 will be installed
---> Package python2-hawkey.x86_64 0:0.22.5-2.el7_9 will be installed
--> Processing Dependency: libdnf(x86-64) = 0.22.5-2.el7_9 for package: python2-hawkey-0.22.5-2.el7_9.x86_64
--> Processing Dependency: libsolvext.so.0(SOLV_1.0)(64bit) for package: python2-hawkey-0.22.5-2.el7_9.x86_64
--> Processing Dependency: libsolv.so.0(SOLV_1.0)(64bit) for package: python2-hawkey-0.22.5-2.el7_9.x86_64
--> Processing Dependency: libsolvext.so.0()(64bit) for package: python2-hawkey-0.22.5-2.el7_9.x86_64
--> Processing Dependency: libsolv.so.0()(64bit) for package: python2-hawkey-0.22.5-2.el7_9.x86_64
--> Processing Dependency: librepo.so.0()(64bit) for package: python2-hawkey-0.22.5-2.el7_9.x86_64
--> Processing Dependency: libdnf.so.2()(64bit) for package: python2-hawkey-0.22.5-2.el7_9.x86_64
---> Package python2-libcomps.x86_64 0:0.1.8-14.el7 will be installed
--> Processing Dependency: libcomps(x86-64) = 0.1.8-14.el7 for package: python2-libcomps-0.1.8-14.el7.x86_64
--> Processing Dependency: libcomps.so.0.1.6()(64bit) for package: python2-libcomps-0.1.8-14.el7.x86_64
---> Package python2-libdnf.x86_64 0:0.22.5-2.el7_9 will be installed
--> Running transaction check
---> Package libcomps.x86_64 0:0.1.8-14.el7 will be installed
---> Package libdnf.x86_64 0:0.22.5-2.el7_9 will be installed
---> Package librepo.x86_64 0:1.8.1-8.el7_9 will be installed
---> Package libsolv.x86_64 0:0.6.34-4.el7 will be installed
--> Finished Dependency Resolution

Dependencies Resolved

Next I tried dnf update:

$ sudo dnf update
<snip>
Running transaction check
Error: transaction check vs depsolve:
(libatomic or libatomic1) is needed by skypeforlinux-8.71.0.36-1.x86_64
rpmlib(RichDependencies) <= 4.12.0-1 is needed by skypeforlinux-8.71.0.36-1.x86_64
To diagnose the problem, try running: 'rpm -Va --nofiles --nodigest'.
You probably have corrupted RPMDB, running 'rpm --rebuilddb' might fix the issue.
The downloaded packages were saved in cache until the next successful transaction.
You can remove cached packages by executing 'dnf clean packages'.

DNF is smart enough to know why the update failed. The package 'skypeforlinux' uses rich dependencies. These dependencies require a version of rpmlib that is greater than the CentOS 7 repositories can provide. Therefore, the dependencies cannot be resolved. There's a tip there to use rpm directly to reconcile the issues, but since I know that the version of rpm is also too low, that won't work.

I decide that I can live without skypeforlinux, so I remove it and both dnf and yum are happy.

At this point in time, since both work, I can use either to keep my system updated. However, having installed dnf and now that I'm comfortable working with it (having learned the syntax and equivalent commands) I think I'll use it from now on.

Saturday, 17 April 2021

The Sony Vaio VGN and Linux

For quite some time now, my preferred desktop OS has been Ubuntu. I made the switch from Fedora after a bad experience with graphics drivers between Core 5 & 6 and decided that Fedora was just a little too cutting edge for me. This was around when I had been playing around with Ubuntu for client desktops and warming to with each new version. For me, the transition to a Debian base system was uncomfortable and I avoided it for a while. The crunch came in early 2007 when I received a Sony Vaio VGN series "hip-top" computer. At the time it was pretty stunning and Sony were pushing them hard - which is probably why they were giving them away to guys like me: so that we would show them off to our clients. In the end, tablets killed off this technology avenue.


Sony Vaio VGN series

I was pretty impressed with the VGN, mainly because it was loaded with peripherals and came with a great docking station. Of course, the first task was to give Windows the flick and install Linux.

With Fedora, almost nothing worked, so I blew that away and installed SuSe. This was much better and most things "worked". The problem was the peculiar UI - which for a touch screen was difficult to work with. Changing the UI on SLED was a problem and it felt a little too "locked down" for my liking. It became painful, so it had to go as well.

Ubuntu seemed to be about halfway there. Some of the special buttons would not work, but I could live without them. It fitted with my purposes at the time, so I was off and running with Ubuntu. It didn't take too long before I preferred it to Fedora.

One of the things I used to dislike about Ubuntu was the default Gnome interface - I preferred KDE. Yes, I know it's also the default for Fedora, but switching interfaces with Fedora was simple. For the Vaio, I chose to install Kubuntu; which at the time was the specific distro for Ubuntu users with KDE. Later I decided to switch back to Gnome (when Gnome updated)and that proved to be a superior experience. The ever present issue was always screen resolution - which never really "fit" the screen. 

I persevered for a few years with the Vaio - mainly for it's 'wow' factor - until I bought a Asus Transformer T300 tablet with keyboard and after that I almost immediately stopped using the Vaio. Despite the tablet being far less powerful, in had a 10" screen and a real keyboard. To make the Vaio usable, I had to become "walking tech" by carrying around a folding keyboard, port replicator, external HDD and a wireless mouse - plus the charger. I ended up selling the Vaio to a colleague for $50.

Tuesday, 11 December 2018

Tutorial: CentOS 7 Installation guide for vmware ESX environments (Part 1)

Although this guide is written specifically for ESX environments, it translates easily to other virtual environments. The same general rules apply even if he steps are slightly different. There is an exception for MS HyperV where its easier just to leave the FDD emulation rather than removing it.

If you're installing RHEL, Fedora, OL or Scientific Linux rather than CentOS, most of the installation will apply although OL has very different recommendations. The instructions here detail a minimal install (Micro-Instance) which will give you an very basic server. Instructions for different footprints will follow in subsequent blog entries. These instructions are based on the 7.4 release of CentOS.

Best practice is to install CentOS from either the NetInstall ISO or the Minimal ISO. Currently, the NetInstall (rev 1708) is 422MB. The Minimal is 792MB. The minimal install contains everything needed to setup a basic server. Additional services must be installed from repositories. The NetInstall requires an active Internet connection (and hence a working NIC) in order to complete even a basic installation. By contrast, the standard ISO is 4.2GiB in size.

It must be assumed that everything is out-of-date as of the initial release. So installing from the standard ISO achieves little as most packages will need to be updated from the repositories. The procedure shown will be using the NetInstall ISO.

FirstCopy the ISO to the vmware ESX server’s ISO folder in the datastore or some location that is easy for you to install from.

Minimal Server Installation (Micro-Instance)


1) Create new server in ESX using ‘typical’ configuration and give it a name.
2) Select the Datastore for the vmdk files and press next.
3) Select Operating System (Linux, CentOS 64bit)

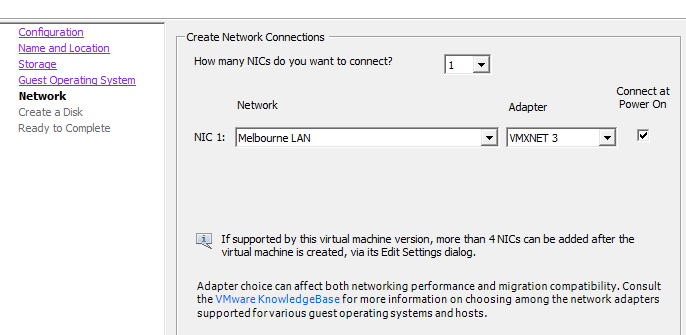
4) Select appropriate NICs. You will need at least one that has access to the Internet. You can add others now (preferably) or later. Make sure you use the VMXNET3 adapter with connect at power on. Use of the e1000 adapter has been shown to cause problems, particularly during ESX upgrades.

5) Setup virtual disks on the datastore. For a micro-instance, we will need to have it thick provisioned. For larger servers, we can create virtual disks for other partitions – these can be thin provisioned, but any partition containing a boot or swap partition needs to be thick. For larger servers, you will likely have the data-containing partitions on a separate SAN connected via multipath.

The disk allocation for a micro-instance should be between 12GB and 32GB. Larger than that and you should allocate a second(or more) disks. If the specific calls for a specific disk size, definitely create another disk – either thick or thin provisioned. For large footprints, eager zero is preferred, but lazy zeroed is fine for a micro-instance.


6) Edit the VM settings (tick box) and click continue. Modify the settings as follows:
  1. Memory: 2048MB is the default. For a micro-instance, this can be reduced to as low as 1024MB – particularly if you don’t plan on a GUI (which you shouldn’t anyway).
  2. CPUs: 2 virtual sockets with 1 core per socket for micro-instance or medium. Increase only as required by application. By choosing 2 cores, SMP will be installed in the kernel. You can reduce it to one later, but make sure there are at least two at installation time.
  3. Video Card: Leave at 4MB with 1 display unless you need a GUI. Then increase to 12MB.
  4. CD/DVD: Set to the CentOS NetInstall or MinimalInstall ISO you added earlier. Check ‘Connect at power on’.
  5. Floppy: Remove


7) Click ‘Finish’

8) Select newly created server in the client, connect to the console and power on.


There should be no need to test the media, so just select ‘Install Centos’. The CentOS installer will then boot:

CentOS Installation (GUI)


1) Language: Select English and your location in the world. In my case, this is Australia.

2) Installation Summary: You will need to modify ‘Date/Time’, ‘Security Policy’, ‘Installation Source’, ‘Installation Destination’ and ‘Network and Host Name’. Since this is a Net Install, we need to modify the Network and Hostname first.


3) Network and Hostname. Enable the network adapter. This will perform an automatic DHCP. Unless you plan on using DHCP for your servers, you should change this to a static address. Change the hostname to the FQDN of the server.


Use the configure button to change the name of the adapter to something easier to remember. You can also change the MAC address here. This is useful if you are creating an immutable server. Under the ‘General’ tab, select “Automatically connect to this network when it is available”. Set the IPv4 address and DNS settings. Add IPv6 if utilised. Click ‘Save’ and then ‘Done’ when finished.


3) Date/Time: Change the timezone if required. Check that NTP is enabled and working.


4) Installation Source: Enter the Centos mirror address and uncheck the mirror list checkbox. Click done and CentOS will begin updating its repository list.

5) Software Selection: I know this is tempting to select what you want here, but stick with the minimal install for now. The only time you really should select anything is if you are installing a compute node or virtualization host.

6) Installation Destination: For a micro-instance, you can settle for the defaults. This will create two physical partitions. The first (sda1) will be a 1GiB boot partition formatted for xfs (the default now under CentOS7). You can change this to ext4 if you like. The second physical partition will use LVM (Logical Volume Management) with two LVM partitions made up of a 1.5GiB swap partition and the rest allocated to root. For simple servers, this will be adequate. Otherwise, modify it here according to the size/space/capability recommendations. Everything here is completely customisable.


7) Once you click ‘done’. You will be given a list of changes the installer is about to do based upon your selections. Check them carefully before accepting.


8) Lastly, we will need to select a security policy. This is an area often overlooked and most installations will choose the default XCCDF profile which contains no rules, although rule lists can be downloaded and applied here. Unless mandated otherwise, use the Standard System Security Profile. The security profiles are administered by Red Hat and not even vetted by CentOS. You will need to consult RHEL documentation for details. In brief, it contains thirteen rules to ensure a basic level of security compliance.

There is a HUGE caveat with the use of security policies: They are something of a black art and emphasise security above all else. This can result in unpredictable changes to your system without notification.

If you want to harden the CentOS setup, I’ll deal with that later. For now, just select the Standard Profile.

Note: There is a bug with the 7.3.1611 ISO with all four STIG security policies that has been fixed with 7.4.1708. Security profiles "Standard System Security Profile" and "C2S for CentOS Linux 7" can't be used in the CentOS 7.5.1804 installer. A bug causes the installer to require a separate partition for /dev/shm, which is not possible.

We could spend hours here. We won’t. That will come with server hardening - when we get to it.


9) Next, click ‘Begin installation’ and installation will start. The next page will work concurrently with the installation.


10) Create a root user and a normal (administrative) user. Ideally, you will only ever use the root login once. After that we will disable root logins completely except from the console. To gain root privileges, you will need to elevate them using sudo by placing administrative users in the ‘wheel’ group (more on that later).

Set the root password to something long a difficult but easy to remember. Make it at least 15 characters by using a phrase with upper/lowercase and numbers eg: 1veGot4LovelyBunch0fCoconuts. Store this password in a secure place (eg keysoft secured by two factor authentication). You will only need this password once and in case of emergencies.

The second user should be your account or a GP admin user. Make sure the password used is strong.


Once installed, select ‘Reboot’. You should disconnect the ISO at some point. Once the server has booted, you will be greeted with the CLI login screen:


At this point, the installation is complete! Login with your admin user and proceed to configuration.

Tomorrows blog entry will deal with configuration.